Pages

Showing posts with label toddler. Show all posts

June 3, 2015

Foam paint ( video included)


What you'll need:
•school glue
•shaving cream
•food coloring
• zip lock bag
• tiny rubber bands (optional)
Directions:
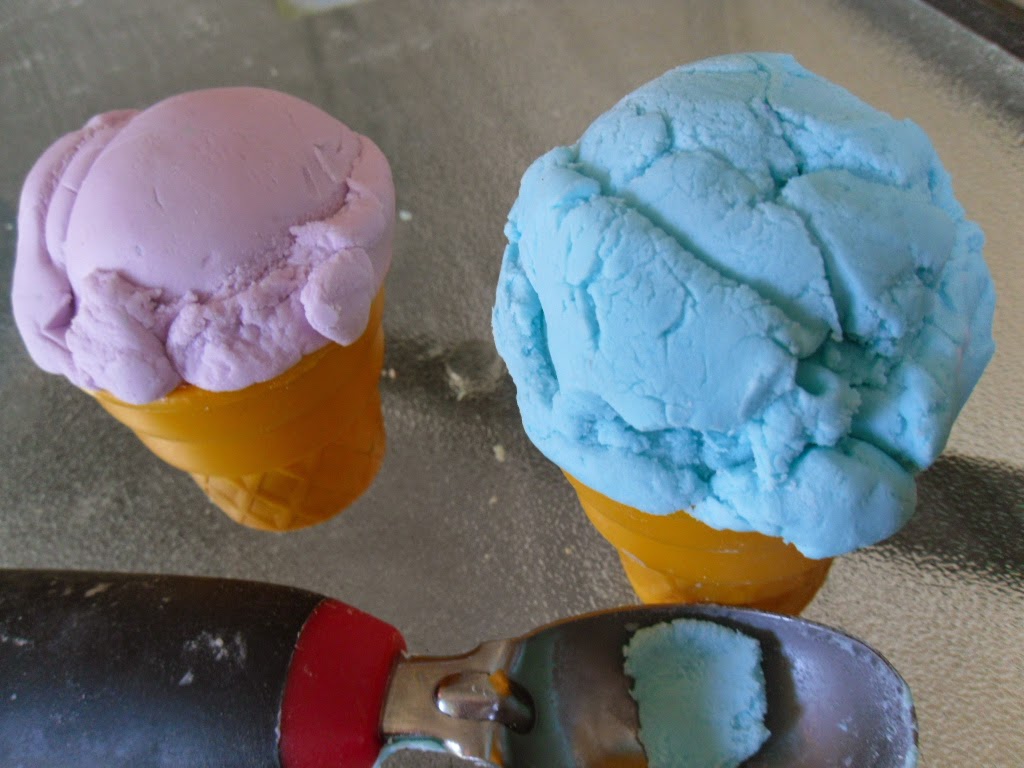
1. Mix equal parts glue and shaving cream in to zip lock bag.
2. Add food is coloring.
3. Let out air, close bag and smush around until fully mixed.
4. pull paint to one corner and tie as at rubber band above the paint to keep the paint at one corner to help little hands paint easier.
5. Snap the tip off and paste piping style
Our Experience:
Messy: yes, we did it in a kiddy pool to contain the mess.
Easy to make: yes. It's very quick to throw together.
Fun: absolutely.
It was near in doing it again over summer break because I know my daughter will love it.


Video

May 27, 2015

Jack and the bean stalk activity (video included)


What you'll need:
• dry beans
•Paper towel
•Zip lock bag
•Tape
•water

Directions: 1. Fold paper towel in to small square about 2in x 2in (doesn't have to be exact)
2. We paper towel with water until nearly dripping.
3. Place bean on the center of the paper towel
4. Insert bean and wet pepper towel into the zip lock bag.
5. Press air out and steal bag
6. Tape bag in a window that gets morning sun if possible.


Our Experience: 
It was a smooth going activity. i already had a a sprouted bean to show them so the knew what we were trying to make happen. We planted that in soil after the the bean project.
We also watched Mickey and the Bean Stalk before jumping in to this activity, just to get everyone extra interested. Best part no clean up. yay for mommy!


Video

May 21, 2015

Neon Colored Rice (video included)

What You'll need:

  • White rice
  • vinegar
  • food colors
  • Rubbermaid container with lid
  • baking pan

Directions: 

  1. Feel you container with rice about half full.
  2. Add 4-6 drops of food color
  3. Put the lid on the container
  4. and shake until rice is fully coated with color
  5. pour rice on to the baking pan to dry.


Our Experience: We love Neon colored rice, like really. Its so simple to make and easy to store. we can dig in it, we can search for things in it and take our hot wheels off roading in it. Its our favorite.


video


November 14, 2014

Silky Soft Play Dough

No cook, 2 ingredient dough. 

You need:

  • 1 part conditioner
  • 2 parts corn starch
  • food color (optional)

Directions:

  1. Mix together the conditioner and corn starch. Add more or less for each ingredient to achieve the desired consistency.
  2. After the dough is formed some separate the dough  for each color you like to make
  3. Add the color and knead the dough until the dough is fully colored.


Our experience:

I had a hard time getting it to the right consistency.It ended up being dry and sticky at the same time. It reminded me of Moon Dough  but when we placed it down on the table and then went to pick it up i would stick. Using cookie cutters didn't work well with this dough. It flaked a lot like the Ice Cream play dough we made but it wasn't a big deal it swept up fine. It was very soft and smelled wonderful. Left our hands soft as can be. At first i thought i didn't like it but i changed my mind as we continued to explore the dough. It wasn't what i had expected but Haven enjoyed it and it kept his attention quite a while...for a toddler that is.


November 13, 2014

Color Sorting Activity For Toddlers

This is his proud face


You Need:

  • An assortment for colored objects ( We used foam shapes we found at the Dollar Tree and the dollar bin at Target)
  • Contraction paper (Dollar Tree)
  • Tape 
  • Pen


Directions:

  1. over lap the sheets of paper to make columns to sort the shapes
  2. Tape the sheets to your work space
  3. label the sheets there proper colors
  4. Sort with your child.

Our Experience:

Haven was a ball of energy today! What made this activity work was patience. He was bouncing every where but he was doing it. After i saw he knew what he was doing I'd put he shaped on the wrong color and ask "Does it go here?. He'd tilt his little head and answer "Noooo." and move it to the correct spot.  He also enjoyed reversing the roles and asking me " Here?", and I'd say "Nooo." Then he'd move it to the correct spot. It was a fun and simple activity that we both enjoyed.


November 7, 2014

DIY Moon Sand ( 2 ingredient)


You need:

  • 4 cups flour
  • 1/2 cup baby oil
  • container (we used the lid off a sheet cake) 

Directions:

  1. Add flour to your container
  2. Drizzle oil evenly over flour.
  3. Knead the oil into the flour with your hands until the all the flour is completely coated

Our Experience:

Why haven't i done this sooner it was so fun. I love playing in sand and so do the littles. It was super quick the throw together and super fun. Haven enjoyed it lots also hahaha. It was pretty messy though. We were covered in white when we were finished. I wouldn't do it in a carpeted area or near upholstery because even tho the flour can be easily vacuumed the oil might stain. 


November 4, 2014

Toilet Paper Roll Monsters


You Need:

  • Toilet paper rolls
  • Tempera paint
  • Pipe cleaners
  • Googly eyes
  • Tissue paper
  • School glue 
  • Shish kabob skewer (or something similar to make holes in the toilet paper rolls)

Directions:

  1. Paint the toilet paper rolls and let them dry. 
  2. Take the skewer and poke two holes on each side of the Toilet paper roll.
  3. Put the pipe cleaner in a hole and feed it though the second hole.
  4. Make loops at each end of the pipe cleaner and twist to make hands.
  5. Glue on the number of eyes you want.
  6. Bunch up tissue paper and put into the top of the toilet paper roll to make hair.
  7. Add a little glue inside the role to fasten the tissues paper to the toilet paper roll.

Our Experience:

This was easy and fun. After we made them we plays monsters together. Roar, roar. It was a good time, even tho the eyes kept falling off. Haydynn was a little smarty and was the only one to paint eyes on hers under the googly eyes.


October 30, 2014

Ice Cream Playdough


 I originally found the recipe for Ice playdough at Smart School House. There they have the exact recipe of how to make it but i left winged it. I'm going to tell you how i did it.

You need:

  • Frosting
  • Powered sugar
  • Food coloring 
  • Mixing bowl

Directions: 

  1. Put Frosting in to mixing bowl
  2. Add food color
  3. Stir
  4. Add about a cup of powdered sugar
  5. mix. Its going to start getting thick.
  6. Add more sugar into the dough and knead it in. In the original recipe she used a mixer with a dough hook attachment but i don't have that so i used my hands. 
  7. You'll want to add powdered sugar until the dough is soft but not sticky.  You'll use about 2 3/4 cups of sugar for a cup of frosting. I didn't measure because was to much works, so i just eye balled it.
  8. Add a drizzle of oil if you added to much sugar or it begins to dry out  


Storage:

Store in a Ziploc bag in the refrigerator . Take out 30 mins before used to soften the dough before play.

Our Experience: 

Haven loved it! he like making ice cream out off it and just simply squishing it with his hands molding it and having fun with it.


For me though it was very messy. Maybe if it wasn't sugar i wouldn't of had a problem with the mess but we have ants. All I could think about was if i didn't clean this really well the ants would be every where and I'm out of Raid. It dried out pretty quickly and flaked of a lot. 
It  was fun and i do think its something you have to try at least once with your littles. I mean come on is playdough made out of frosting, that is kids two favorite things combined.